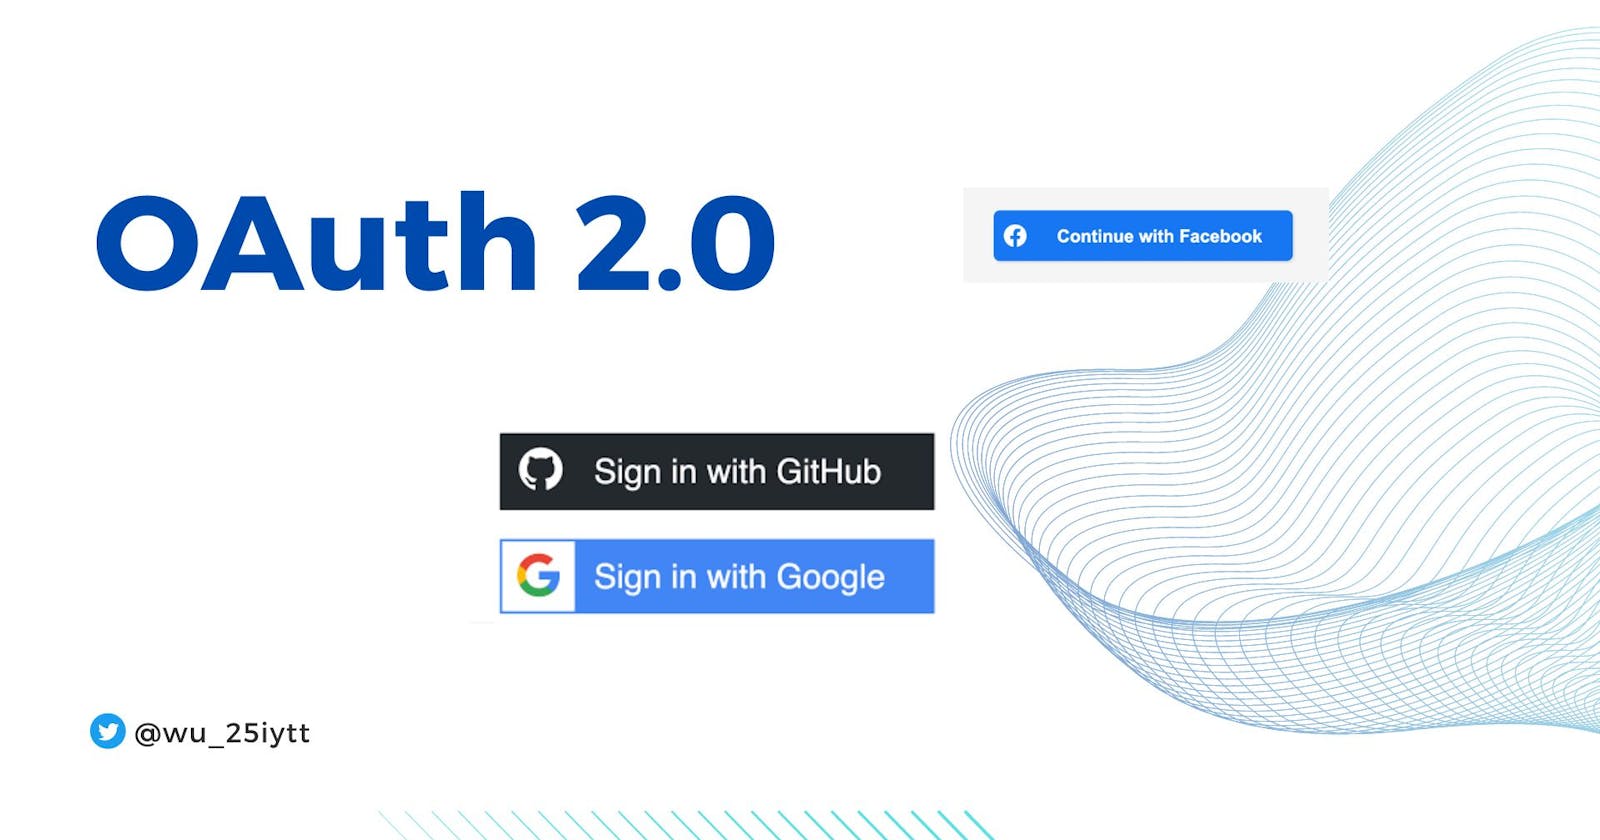
A Step-By-Step Guide to OAuth 2.0: Implementing Sign In with Google, Facebook, and GitHub
A Step-By-Step Guide to Implementing Sign In with Google, Facebook, and GitHub Using OAuth 2.0


Table of contents
- Introduction: What is OAuth 2.0 and How Does it Work?
- What exactly is special about OAuth? Why OAuth?
- How does it work in reality?
- Pre-requisites:
- Creating an Express app
- Add cookies and sessions
- How to Implement Sign-In with Google using OAuth 2.0
- How to Implement Sign-In with Facebook using OAuth 2.0
- How to Implement Sign-In with GitHub using OAuth 2.0
- Common Pitfalls When Integrating Sign-In With Google/Facebook/Git
- Conclusion
Introduction: What is OAuth 2.0 and How Does it Work?
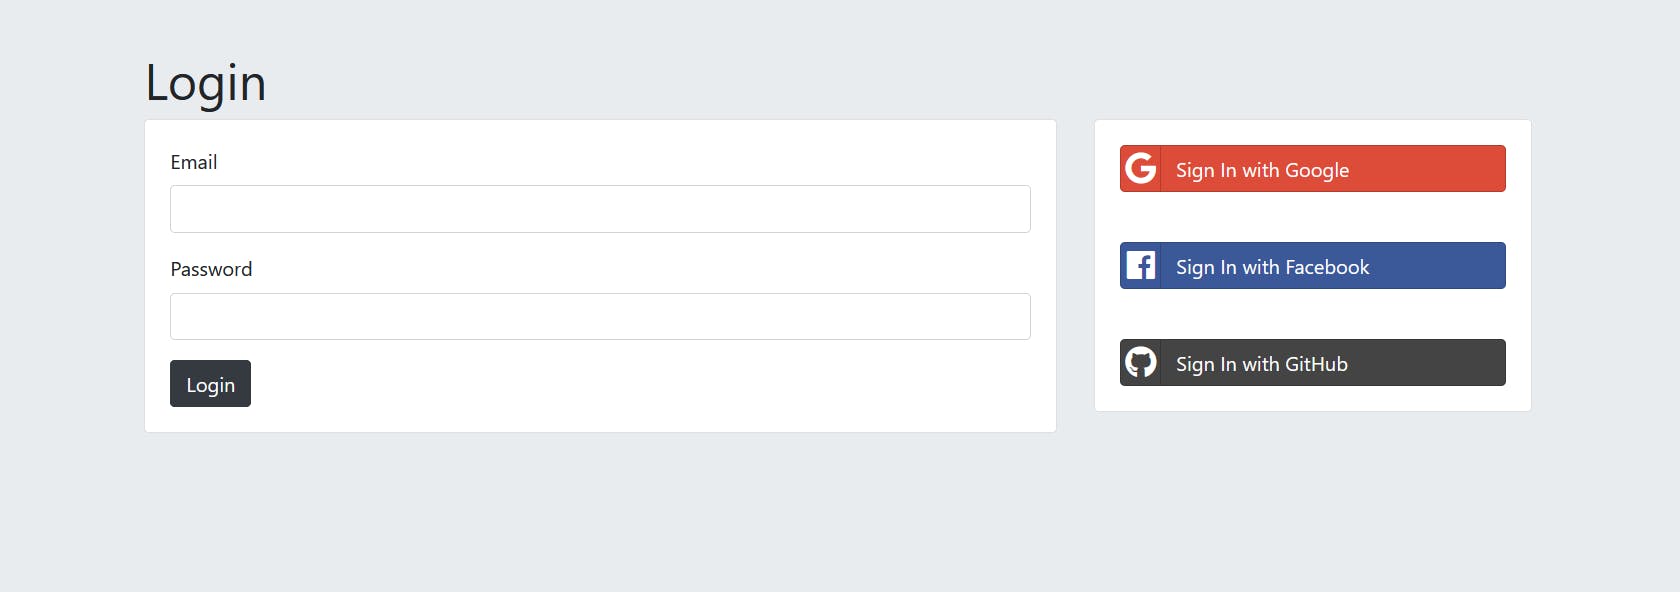
OAuth is simply an open standard for token-based authorization that makes it easier for users to sign into your web app without having to create a new account each time. For example, if you're building a blog app, a new user of the app would normally have to create an account manually by filling out a form with a username, email and password. However, if you use OAuth instead, the user can log in with their existing Facebook, Google or GitHub account. This not only saves the user time but also helps reduce the number of abandoned accounts on your app.
For example, when we log in with Google, we are making a GET request to Google asking for the user's details. Google then responds with a POST request that includes the user's information. When it comes to authentication and security, another great benefit is that we can trust companies like Facebook and Google to manage passwords securely. These companies are known for having great engineers and teams who can provide the highest level of security.
As a developer, we can implement hashing, and salting to further increase password security using complex mathematical functions; however, it would take a considerable amount of time and effort for an individual or a small team. So why not we just delegate these tasks to large companies like Facebook and Google? Then, every time users log in to our app, we simply ask them to log in on Facebook and Facebook will then authenticate them using their security methods. After that, Facebook sends us the message saying this user is authenticated, they're a real Facebook user, and they've got the correct username and password, so we can go ahead and authenticate them in our app too.
OAuth will make our life a lot easier when it comes to third-party login options such as logging in with Google or Facebook. With OAuth, we will have less liability and this is the way that many websites only allow this type of login. Although we need to learn about OAuth to implement these changes, it will be worth it in the end!
What exactly is special about OAuth? Why OAuth?
as there are a lot of other open standards that do something similar to these;
OAuth is quite special in three ways:
Granular Access Levels: Granular access means that when a user logs in with Facebook, you can request specific information from their account. So, for example, if you only need their profile and email address for your app, you can request that data accordingly. This allows apps to only request the data they need, which helps protect user privacy.
Read or Read + Write Access: it allows for either Read Only or Read and Write Access. So in the case of Facebook, this means that we can either ask them to just retrieve pieces of information about their Facebook account like their name, email, and friends list. Or we can ask for write access as well. Say for example in our previous case if our blog app wanted to be able to post to Facebook on this user's account then we would need to ask for read-and-write access.
Revoke Access: The third-party service we're using to authenticate our users must give them the ability to revoke access at any time. For example, if we're authenticating with Facebook, the user should be able to go into their Facebook account and de-authorize the access they granted to our website. This way, they don't have to go onto our site and potentially struggle to remove our access.
So now that we've looked at what's special about OAuth, the next thing to talk about is, well...
How does it work in reality?
Step 1: Set Up Our App
The first step is to tell Facebook, GitHub or Google about our Web application. We have to set up our app in their developer console and return, we get an App ID or Client ID. Our website is then the client who will make requests to Facebook to authenticate our users.
Step 2: Redirect to Authenticate
The next step in the process occurs when the user visits our blog app and attempts to log in using their Facebook credentials. By giving the user the option to log in with Facebook, we streamline the process and make it more convenient for them.
Step 3: User Logs In
We'll take users to the Facebook website when they click on the Facebook option, so they can log in using their Facebook credentials. This way, they'll be seeing a familiar and trustworthy interface.
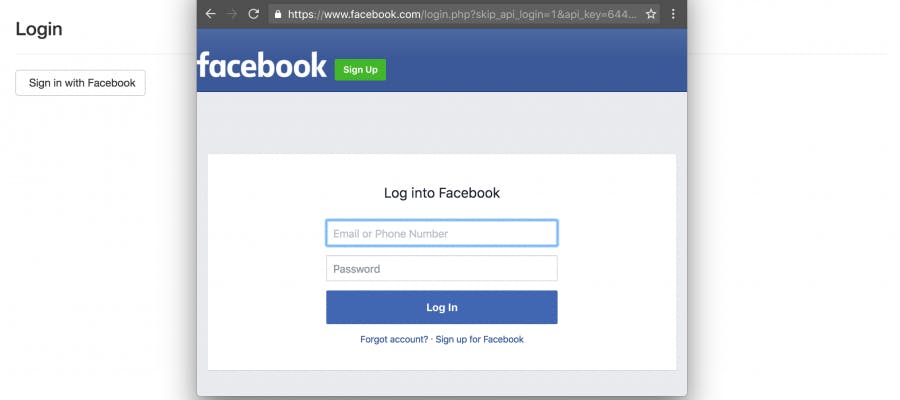
If we didn't have OAuth, we would have to ask users for their login credentials for Facebook, which would seem sketchy and insecure. OAuth makes that process a lot easier by allowing users to log in to the website they trust (Facebook) using credentials they're already familiar with.
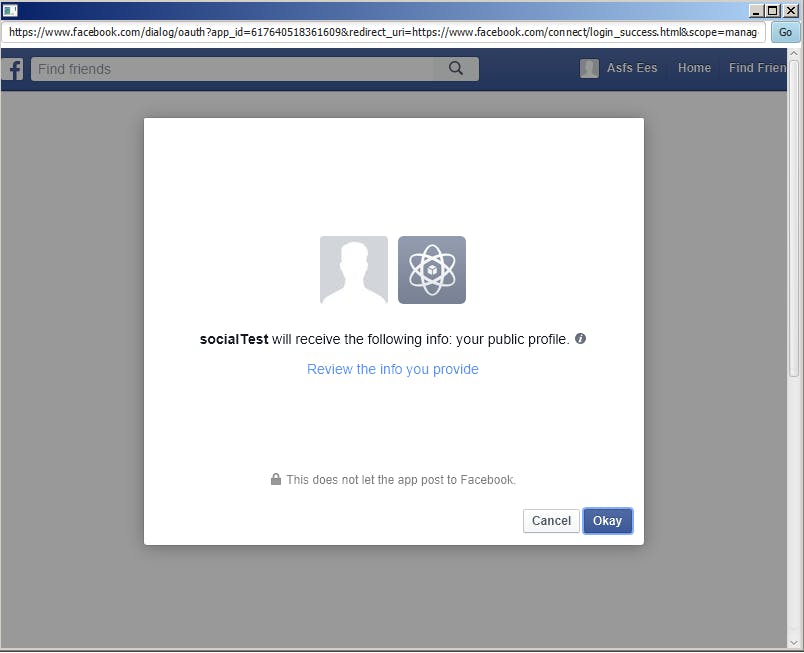
Step 4: User Grants Permissions
When a user logs into our website from a third-party site, they will be prompted to review the permissions that our website is requesting. For example, we might want their profile and email address. If they're OK with granting us that permission, they click "allow."
Step 5: Receive the Authorisation code
So now that they've granted us permission and successfully logged in on Facebook, our website will receive an authorization code. This allows us to check if the user has signed in to Facebook with the correct credentials. If everything checks out, we're then able to authenticate the user and log them into our website.
Step 6: Exchange AuthCode for Access Token
If we wanted to go a step further, we can exchange our authentication code for an access token. And when we receive that access token from Facebook, we would save it into our database because this is the token that we can use if we want to request pieces of information subsequently.
The access token is valid for a lot longer than the authentication token, so we can think of the authentication code or OAuth code as being like a ticket. It's a ticket that we're only going to use once to get into the cinema.
An access token is a lot like a year-long pass to an amusement park. It allows you to request data from Facebook that the user has allowed you to access, such as their friend list, username, or password.
The OAuth code is what we use to authenticate a user who has successfully logged in through Facebook. The access token is what we'll use to access information that is stored on that user's account, such as their email or friend's list.
Now that we know all of this, let's go ahead and put it into practice. We're going to be implementing login with Google, Facebook, and Github using Passport.js and Google OAuth, Facebook Outh, and GitHub OAuth inside our Express app.
Pre-requisites:
Creating an Express app
To save time, we can use a starting Express and EJS project from a fork or clone from here:
$ git clonehttps://github.com/Ugyenwangdi/OAuth.git$ cd OAuth$ npm init -y$ npm install dotenv --save$ npm install express ejs body-parserRun the server from the terminal and check if we can see the rendered pages at http://localhost:3000/:
$ node app.js
Next, we're going to create a user database to store the data for each user. We'll use mongoose and MongoDB to do that. You can install mongoose using npm:
$ npm i mongooseImport the mongoose inside
app.jsand connect to MongoDB. In the following code, we called our database name "testDB".const mongoose = require("mongoose"); mongoose.set("strictQuery", true); main().catch(err => console.log(err)); async function main() { await mongoose.connect("mongodb://127.0.0.1:27017/testDB"); };Set up a new user collection where we can store users' details. To do that, create a user schema just after the database connection. After that use the user schema to set up a new "User" model. Since we are not storing passwords in our database, we specified only these three fields.
 const userSchema = new mongoose.Schema ({
     email: String,
     username: String,
     googleId: String
 });

 const User = new mongoose.model("User", userSchema);
Now we can start creating users and adding them to testDB.
Add cookies and sessions
We're going to be implementing cookies and sessions into our website and we're going to be doing it using Passport.
Passport is an authentication middleware for Node.js that is extremely flexible and easy to use. It supports authentication using a local strategy, where users enter their username and password, as well as using a variety of other services such as Google, Facebook, Twitter, and more.
To get started we need to install using:
$ npm i passport express-session
And now we're ready to go ahead and incorporate it into our
app.js. So let's get started. Let's requirepassportandexpress-sessionconst session = require("express-session"); const passport = require("passport");The next thing to do is to set up our session and we’re going to use a bit of code where we say app.use() and we're going to call session and we're going to pass in some options such as
secret,resaveandsaveUninitialized. And we're going to place this code just above where we have mongoose.connect() and just below all of the other app.use()'s as follows:app.use(express.static("public")); app.set("view engine", "ejs"); app.use(bodyParser.urlencoded({extended: true})); // SET UP SESSION------below code comes from express-session app.use(session({ secret: process.env.PASSPORT_LONG_SECRET, resave: false, saveUninitialized: false })); mongoose.set("strictQuery", true); main().catch(err => console.log(err)); async function main() { await mongoose.connect("mongodb://127.0.0.1:27017/testDB"); };Now if you're wondering what all of those things are doing, then be sure to read through the documentation to see why we're choosing the options.
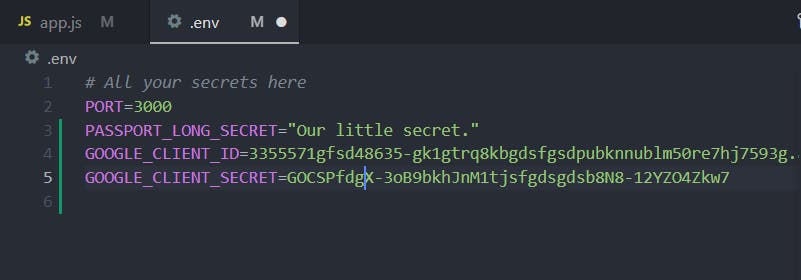
Now add the
PASSPORT_LONG_SECRETinside .env as below, you can give anything here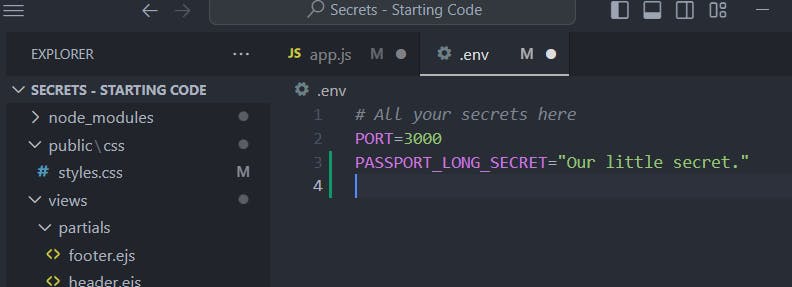
After we've set up our session, the next step is to initialize and use passport. So we'll call app.use() right below where we initialized our session, we'll use passport to set up our session. This will tell our app to use passport for authentication purposes. You can find more information on working with Express-based applications here.
 app.use(passport.initialize());
 app.use(passport.session());
How to Implement Sign-In with Google using OAuth 2.0
So let's get started implementing it and adding login with Google to our website.
Head over to passportjs.org and we're going to go and find the strategy that we need. So here we'll find these two Google OAuth strategies. One is passport-google-oauth and the other one is passport-google-oauth20.
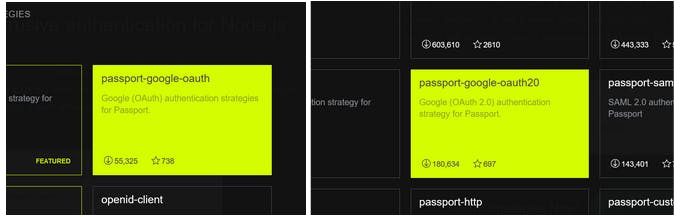
And we're using the latest implementation of OAuth, OAuth 2.0 with Google. So let's select the second one and check on how to use it on their documentation here:
We first need to install the package:
$ npm install passport-google-oauth20The next thing they want us to do is to create an application on the Google developer's console
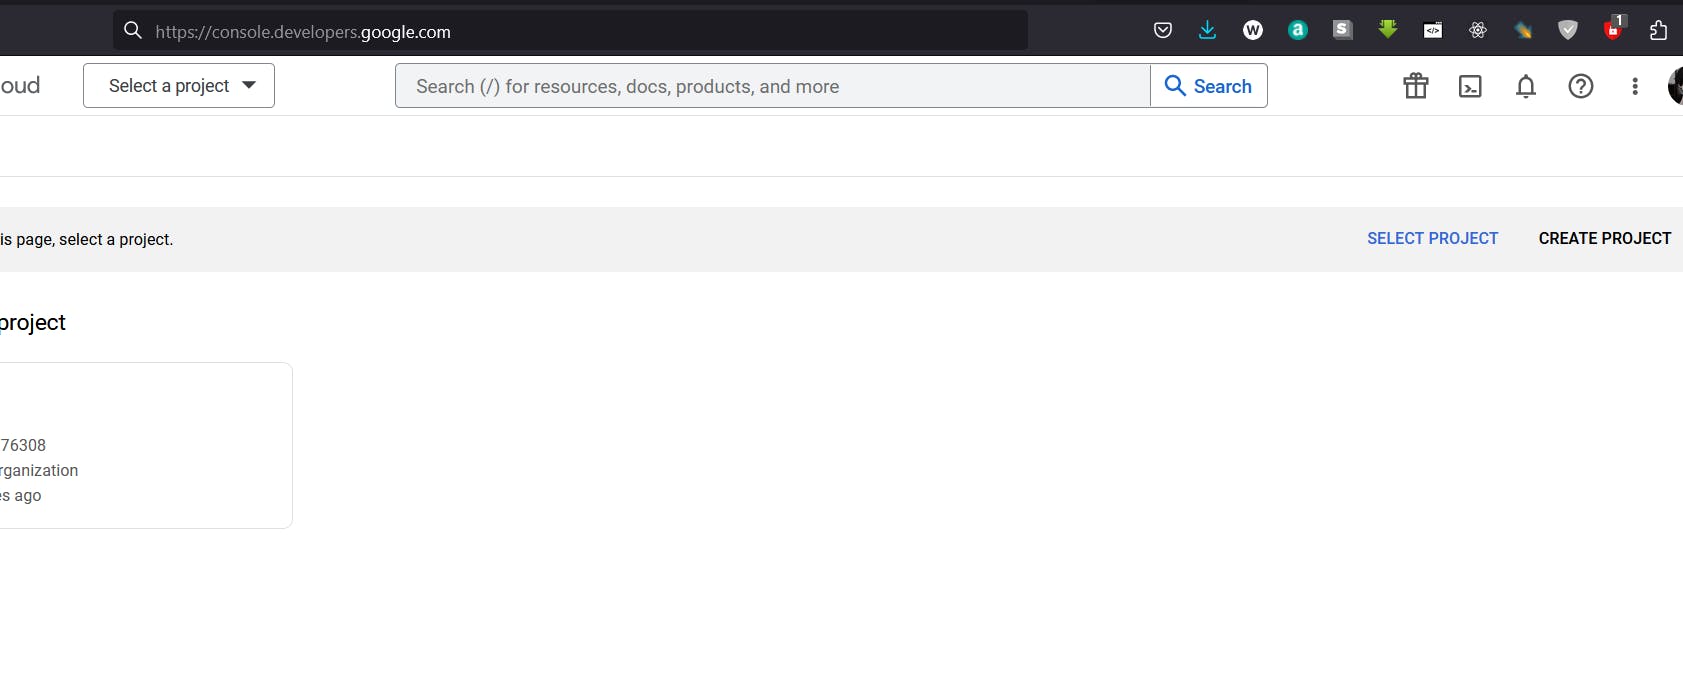
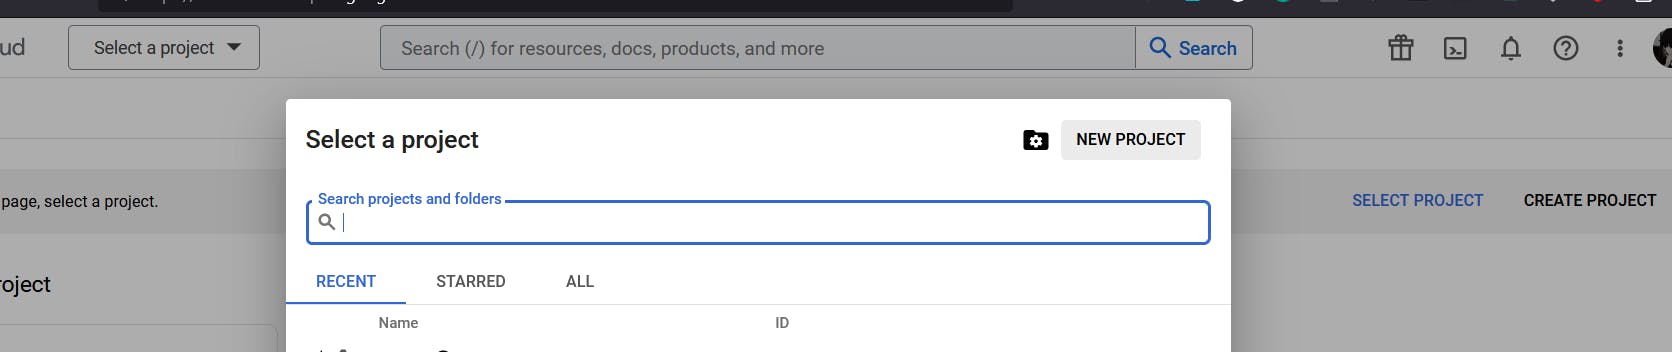
Now once we're here we should be able to go ahead and create a project by searching for a NEW PROJECT button and clicking on it
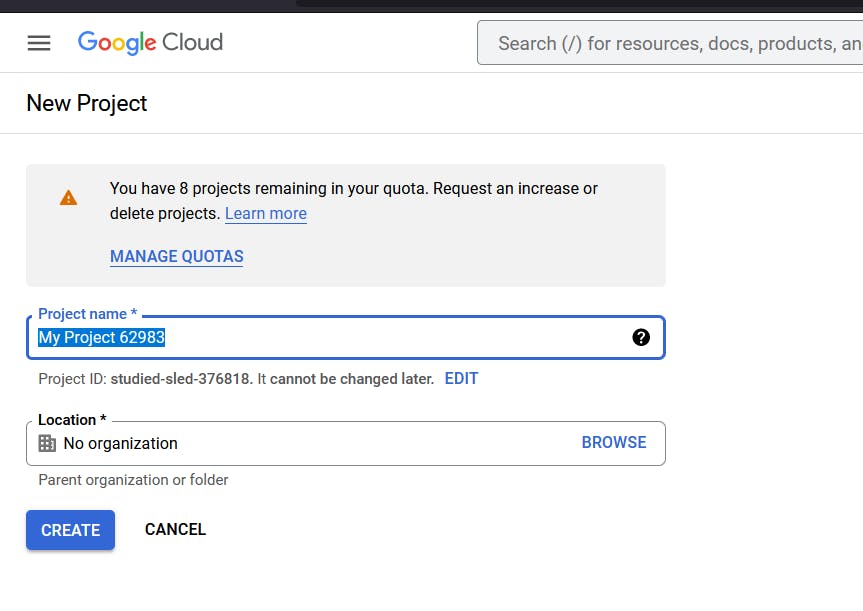
Now we're going to give our project the name and you can leave everything else as default and go ahead and click CREATE.
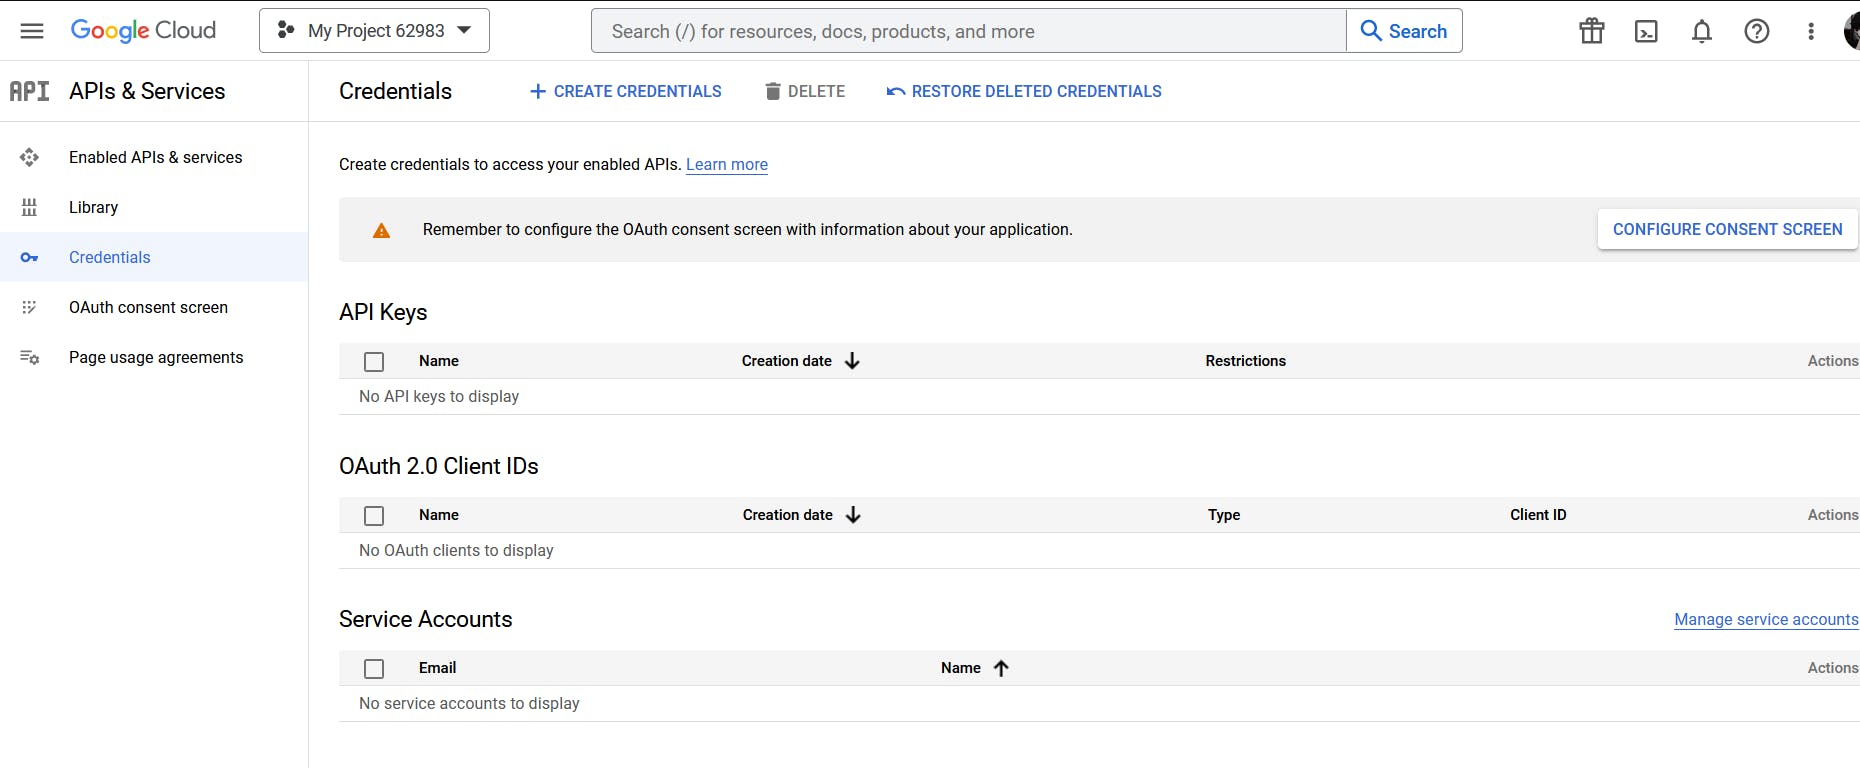
So now we’ve created our project, we should be able to go ahead and set up our credentials for Google OAuth inside our project. If you cannot find the credentials tab, click on the menu at the top left and search for credentials inside the APIs and Services tab. The screen looks as follows:
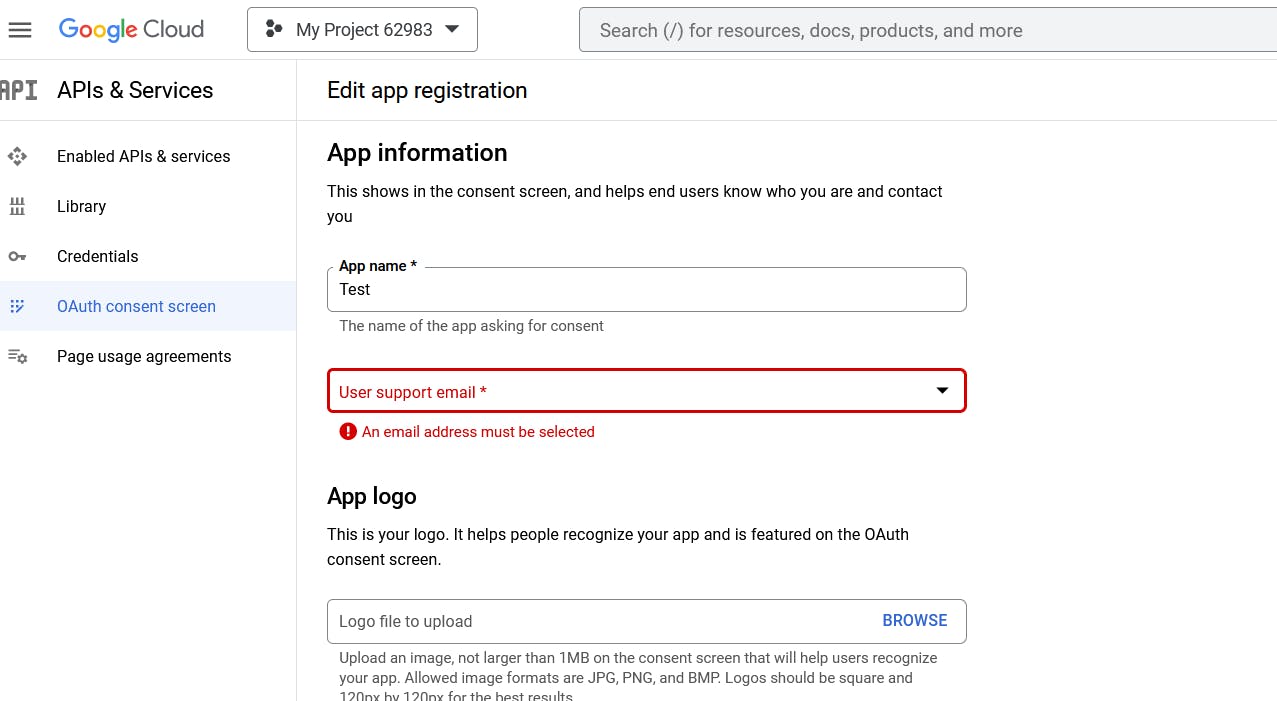
The first thing we have to do is to set up the OAuth consent screen, so click on CONFIGURE CONSENT SCREEN and we're simply going to configure the screen that the user sees when they log in through Google and grant our application access to their data.
And then click on CREATE by selecting the User Type or keep it as default without checking one:

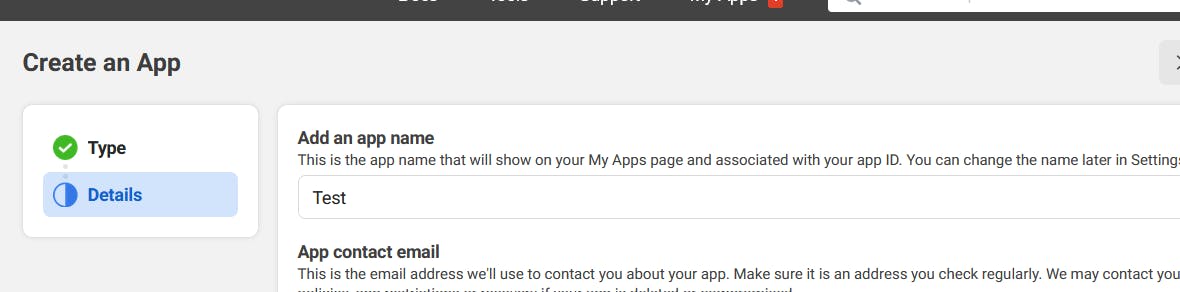
So it's helpful for them to know what application they're talking about so we're just going to put in the name of our app here, and if we have a logo. For now, just provide the name and email since they’re required and keep others blank. After that click SAVE AND CONTINUE
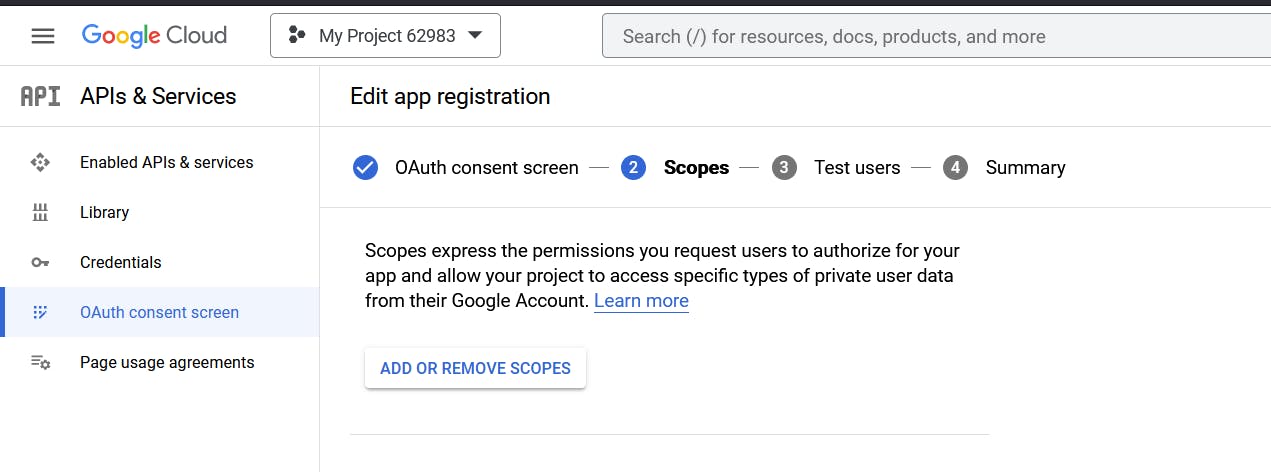
And the last thing on this page is the part where it says Scopes where we can select the fields that we will receive once the user logs in through Google. So in our case, we're probably only interested in the email and the profile ID of our user who's logged in.
Click on ADD OR REMOVE SCOPES
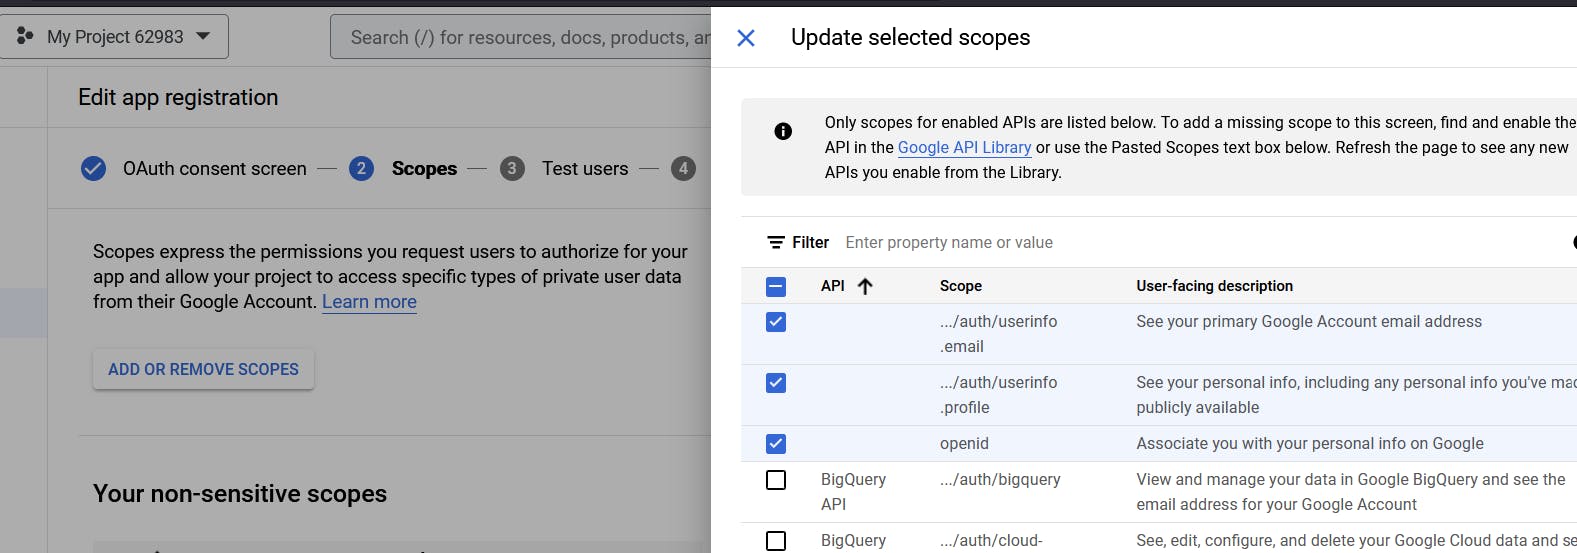
So this is where we can check the fields we are interested in and click on UPDATE
So now that we’ve set up our scope, after that we'll keep everything default. So let's go ahead and hit SAVE AND CONTINUE till we reach the summary screen.
And now we get to create our API credentials by clicking on the CREATE CREDENTIALS button and selecting the OAuth client ID and this is going to allow us to authenticate them using Google.
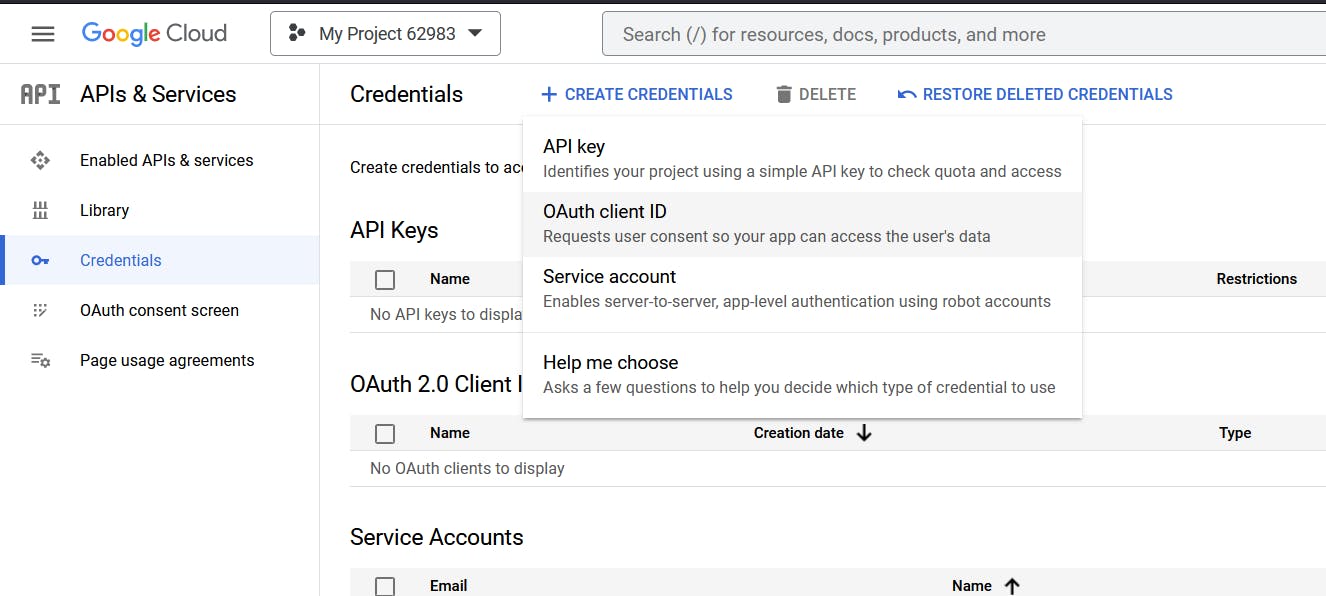
Select a Web application.
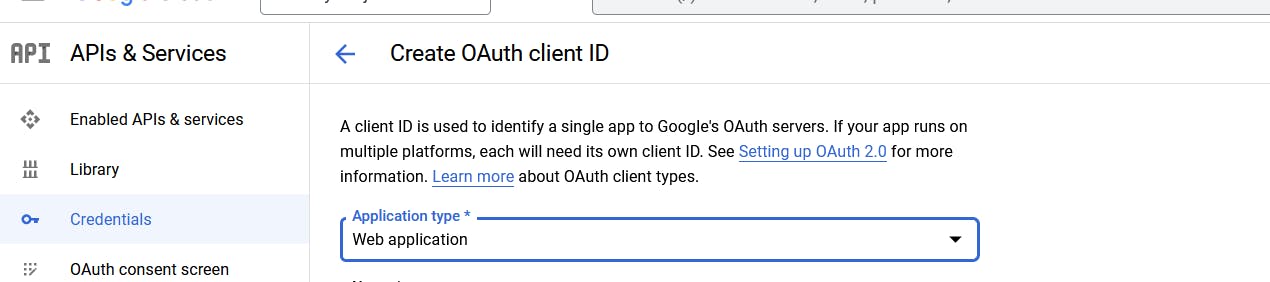
Give the name of our app and then there are two other fields that we have to fill in. One is the origin, so where is that request to Google going to come from? And in our case, it's going to come from our local host.
So we'll put an http://localhost:3000 and this is obviously for when we're testing. And when your website is live you can come back here and change it at any time.
So the second thing that we have to add here is the redirect URI. So this is a route where an authenticated user is to return to so that we can then locally authenticate them in our app.
So here we're gonna put http://localhost:3000/auth/google/secrets.
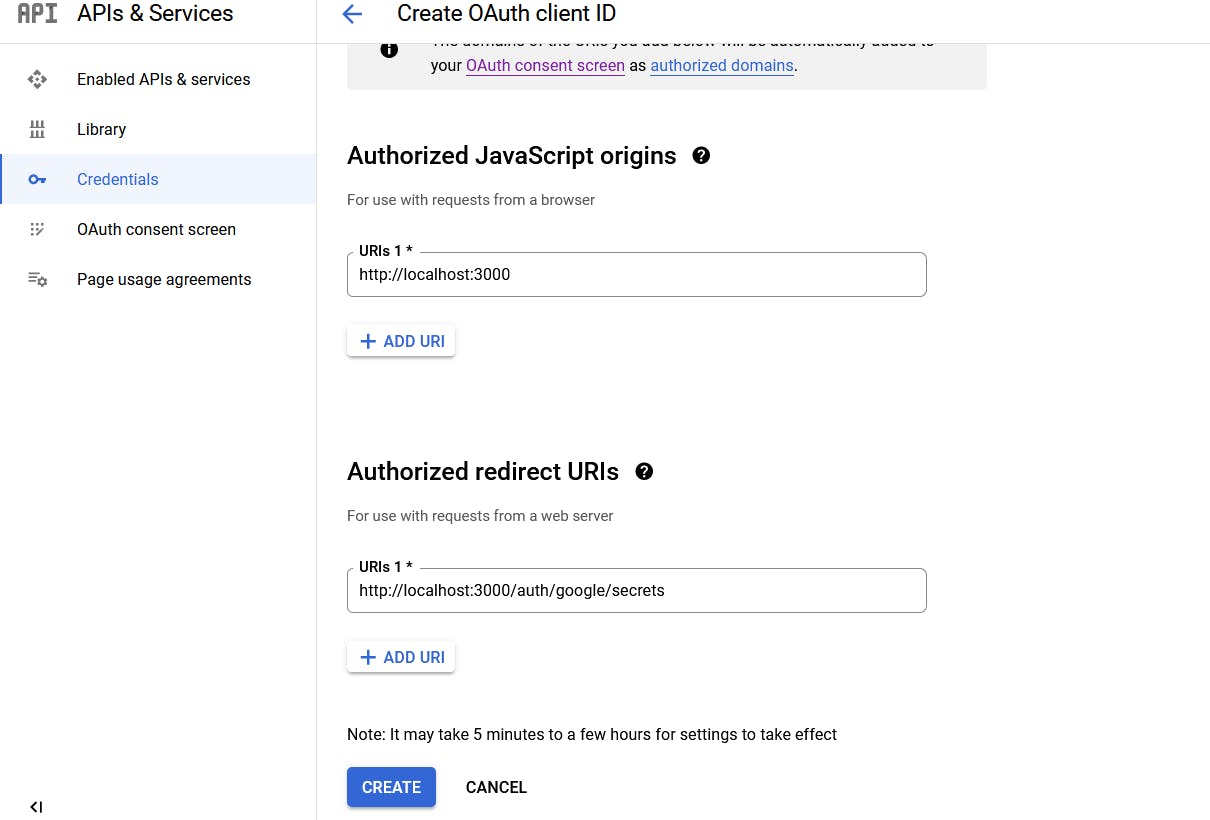
Once you've made sure that both of these are correct then go ahead and hit CREATE and we get our Client ID, Client Secret which we must keep secret. So that means we're going to put it into our .env file.
So now we have those two things and we can get back to setting up our Google Strategy using passport. And the first thing that we have to do is we have to require this package in our code.
const GoogleStrategy = require("passport-google-oauth20").Strategy;Using the details we received from the Google developer console, we need to set up our Google strategy and configure it. To do this, add the code below the mongoose connection. The callbackURL has to match redirect URIs that we provided inside the Google console.
Note that it has to be below the sessions setting and right before all the routes, otherwise it won't save the user login sessions.
// -------GOOGLE STRATEGY--------
passport.use(new GoogleStrategy({
    clientID: process.env.GOOGLE_CLIENT_ID,
    clientSecret: process.env.GOOGLE_CLIENT_SECRET,
    callbackURL: "http://localhost:3000/auth/google/secrets"
  },
  function(accessToken, refreshToken, profile, cb) {
    User.findOrCreate(
        {
            googleId: profile.id
        },
        function (err, user) {
            return cb(err, user);
        }
    );
  }
));
The second part of this configuration is a callback function. This is where Google sends back an access token that allows us to get data related to that user and we've also got their profile, which is essentially what we're interested in because it contains their Google ID, email or anything else that we've got access to.
We can then finally either find a user with that ID in our database of users or create them if they don't exist.
Now if we try to search for the method, findOrCreate in MongoDB or mongoose, we won’t find it as it's not a MongoDB or a Mongoose function. It's something that the passport package tries to implement some sort of functionality to find or create the user.
There's an NPM package called
mongoose-findorcreateto make this work is to just install and require it:$ npm install mongoose-findorcreateconst findOrCreate = require('mongoose-findorcreate')Now the documentation tells us to do is to add this as a plugin to our schema like shown below
const userSchema = new mongoose.Schema ({
  email: String,
  username: String,
  googleId: String
});

userSchema.plugin(findOrCreate); // plugin here
const User = new mongoose.model("User", userSchema);
Now that we have our backend set up, we need to create a way to use it from our front end. When we click on the "Sign up with Google" or "Sign in with Google" button, we should be able to log in and register.
In our view for login and register, we have an anchor tag that links to the
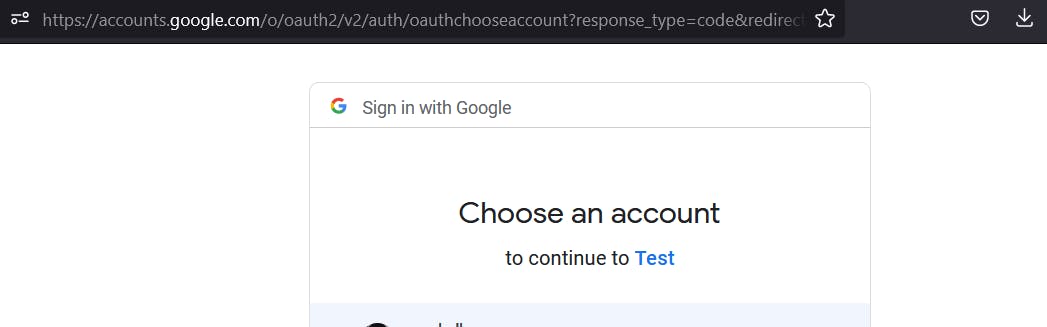
href/auth/google. We haven't created that so, inside app.js right belowapp.get(“/”)add the route and authenticate with Google.We're going to use passport and we provide the type of strategy that we want to authenticate our user with, so this is going to be "google" as a string and the next thing we have to provide is scope as mentioned by documentation.
// -----GOOGLE AUTHENTICATION-----
app.get("/auth/google",
    passport.authenticate("google", { scope: ["profile"] })
);
Test it out by running the app and going over to the register page, by clicking on the sign up with Google, it should take us to a page on google itself
Now we need to set up the "auth/google/secrets" route, which is our redirect URI. This is where Google will send the user after it's authenticated on their server.
We need to authenticate the user locally on our website and save their login session using sessions and cookies. Add this code just below the one we added above:
app.get("/auth/google/secrets",
  passport.authenticate("google", { failureRedirect: "/login" }),
  function(req, res) {
    // Successful authentication, redirect home.
    res.redirect("/secrets");
});
If authentication fails, we'll redirect the user to the login route. If it was successful, we'll redirect them to the secrets page where they'll see a welcome message.
Since we don't have the
/secretsroute yet, we can create it just below our/registerroute.app.get("/secrets", function(req, res){ if (req.isAuthenticated()){ res.render("secrets"); } else { res.render("/login"); } });So now let's test it out at localhost:3000. Now at this point you might end up with an error like "Failed to serialize user into session".
Configure the passport package to serialize and deserialize users. To check on how to do that, we can always refer to the documentation.
passport.serializeUser(function(user, cb) {
    process.nextTick(function() {
        return cb(null, user.id);
    });
});

passport.deserializeUser(function(user, cb) {
    process.nextTick(function() {
      return cb(null, user);
    });
});
If we go back to localhost:3000 and register our user using Google then you can see it takes us to a page that says welcome.

If we look into our database using MongoDB compass or any other database visualizer, we will notice that a new user with googleId is being created. This id uniquely identifies the user on the Google user database.
Even if we log out and try to register again with the same Google account, we can see that the system still recognizes the user because their Google ID is associated with the account. This is great because it means we don't have to save any passwords, which can be a potential security issue.
We haven't yet defined a logout route. So let's go and add it in. And here is where we're going to essentially de-authenticate our user and end that user session. Add this code at the end of
/secretsrouteapp.get("/logout", function(req, res){ req.logout(function(err) { if (err) { return next(err); } res.redirect("/"); }); });So now, when a user logs into our website, they will be able to access the authentication-required parts of the website without having to log in again. This is because once a user logs in, their information will be saved in a cookie for that particular session.
Let’s style up our buttons so that when we add a few more buttons, sign up with Facebook, and GitHub, it would look cleaner.
So we're going to use something called social buttons for Bootstrap. Download the code and extract it, we should see a file called bootstrap-social.css and we're simply going to drag that file into our public CSS folder next to our
styles.css.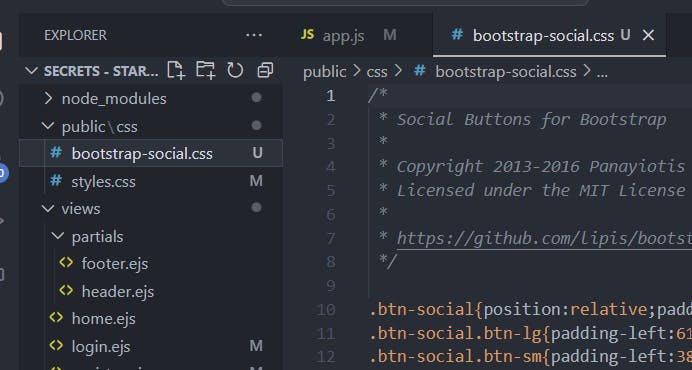
Head over to our
header.ejsand link it:
Let's add
btn-socialandbtn-googleclass to the anchor tag insidelogin.ejsandregister.ejs.<a class="btn btn-block btn-social btn-google" href="/auth/google" role="button"> <i class="fab fa-google"></i> Sign In with Google </a>
How to Implement Sign-In with Facebook using OAuth 2.0
Install passport-facebook and require it inside app.js
$ npm install passport-facebookconst FacebookStrategy = require("passport-facebook").Strategy;Create a new app at Facebook Developers. We will be issued App ID and App Secret for our app which need to be provided to the strategy.

Choose the type as Consumer and click Next

Give the app name and click Create app
Now inside the settings, click on the Basic tab and we will get our App secret and App ID. We might also be to add our website domain here which is localhost.

Copy the two keys inside the
.envfile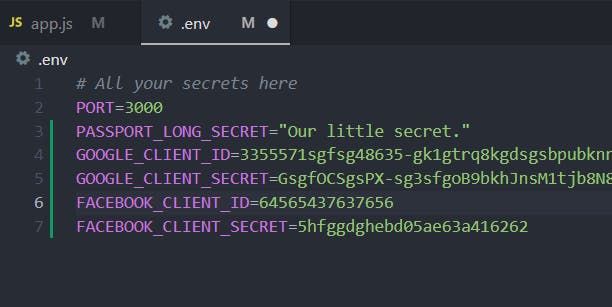
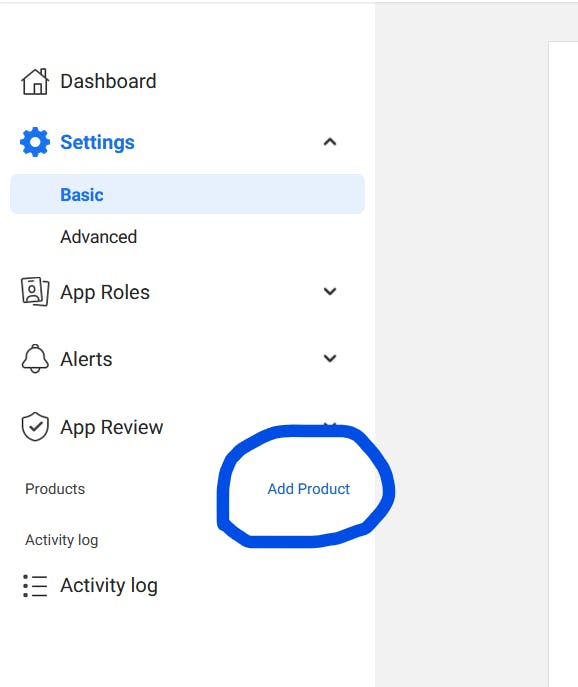
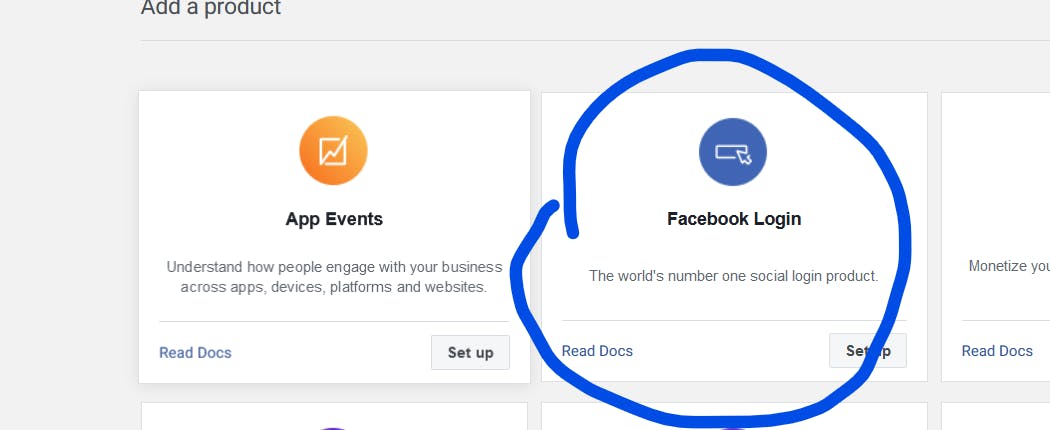
On the left panel, click on Add product and choose Facebook login
Inside Facebook Login settings tab, under Quickstart, select Web and add the
Site URL
http://localhost:3000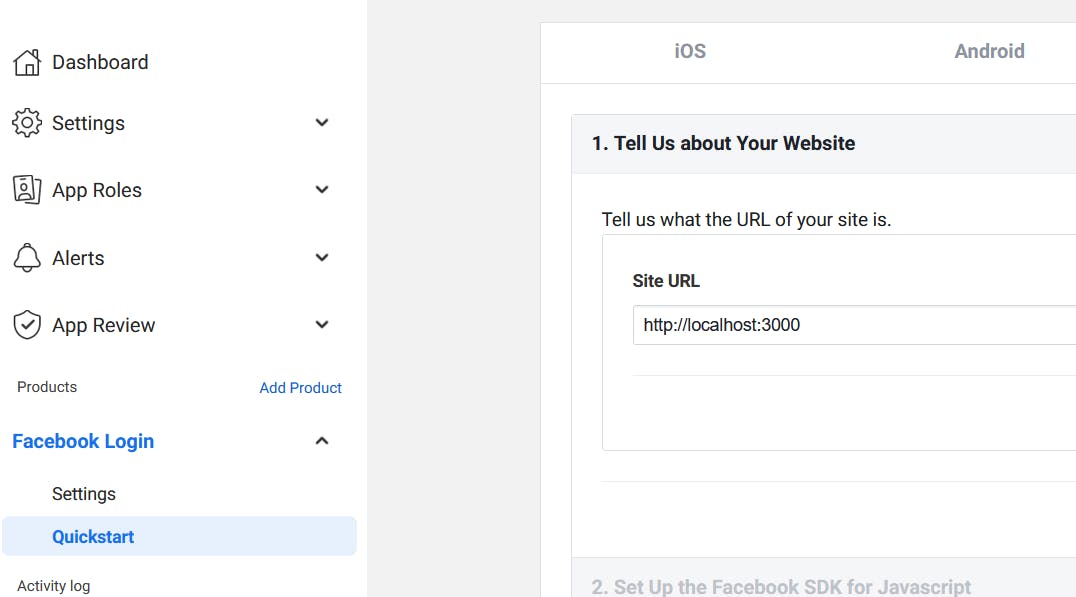
We need to add facebookId for our userSchema
 const userSchema = new mongoose.Schema ({
   email: String,
   username: String,
   googleId: String,
   facebookId: String
 });
Let's configure the Facebook authentication strategy. Add the following code just below the Google strategy like shown below
 // -------GOOGLE STRATEGY--------
 passport.use(new GoogleStrategy({
     clientID: process.env.GOOGLE_CLIENT_ID,
     clientSecret: process.env.GOOGLE_CLIENT_SECRET,
     callbackURL: "http://localhost:3000/auth/google/secrets"
   },
   function(accessToken, refreshToken, profile, cb) {
     User.findOrCreate(
         {
             googleId: profile.id
         },
         function (err, user) {
             return cb(err, user);
         }
     );
   }
 ));

 // -------FACEBOOK STRATEGY--------
 passport.use(new FacebookStrategy({
     clientID: process.env.FACEBOOK_CLIENT_ID,
     clientSecret: process.env.FACEBOOK_CLIENT_SECRET,
     callbackURL: "http://localhost:3000/auth/facebook/secrets",
     enableProof: true
   },
   function(accessToken, refreshToken, profile, cb) {
     User.findOrCreate({ facebookId: profile.id }, function (err, user) {
         return cb(err, user);
     });
   }
 ));
Create a route for Facebook authentication and the redirection just below the Google authentication routes
// -----FACEBOOK AUTHENTICATION-----
app.get('/auth/facebook',
    passport.authenticate('facebook', { scope: ["email"] })
);

app.get('/auth/facebook/secrets',
  passport.authenticate('facebook', { failureRedirect: '/login' }),
  function(req, res) {
    // Successful authentication, redirect secrets.
    res.redirect('/secrets');
});
We've added the backend for our app, let's go ahead and add the buttons inside
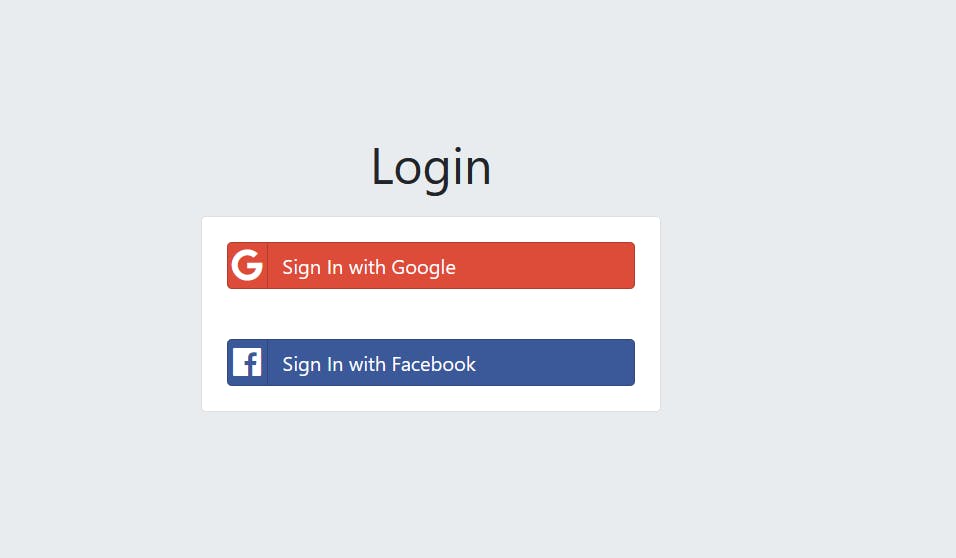
login.ejslike following<div class="oauthbox col-sm-4"> <div class="card"> <div class="card-body"> <a class="btn btn-block btn-social btn-google" href="/auth/google" role="button"> <i class="fab fa-google"></i> Sign In with Google </a> </div> <div class="card-body"> <a class="btn btn-block btn-social btn-facebook" href="/auth/facebook" role="button"> <i class="fab fa-facebook"></i> Sign In with Facebook </a> </div> </div> </div>Inside
register.ejs<div class="oauthbox col-sm-4"> <div class="card social-block"> <div class="card-body"> <a class="btn btn-block btn-social btn-google" href="/auth/google" role="button"> <i class="fab fa-google"></i> Sign Up with Google </a> </div> <div class="card-body"> <a class="btn btn-block btn-social btn-facebook" href="/auth/facebook" role="button"> <i class="fab fa-facebook"></i> Sign Up with Facebook </a> </div> </div> </div>Let's check our app by going to http://localhost:3000
How to Implement Sign-In with GitHub using OAuth 2.0
Install passport-github and require it inside app.js
$ npm install passport-github2const FacebookStrategy = require("passport-facebook").Strategy;Create a GitHub OAuth application here and get the App ID and App Secret
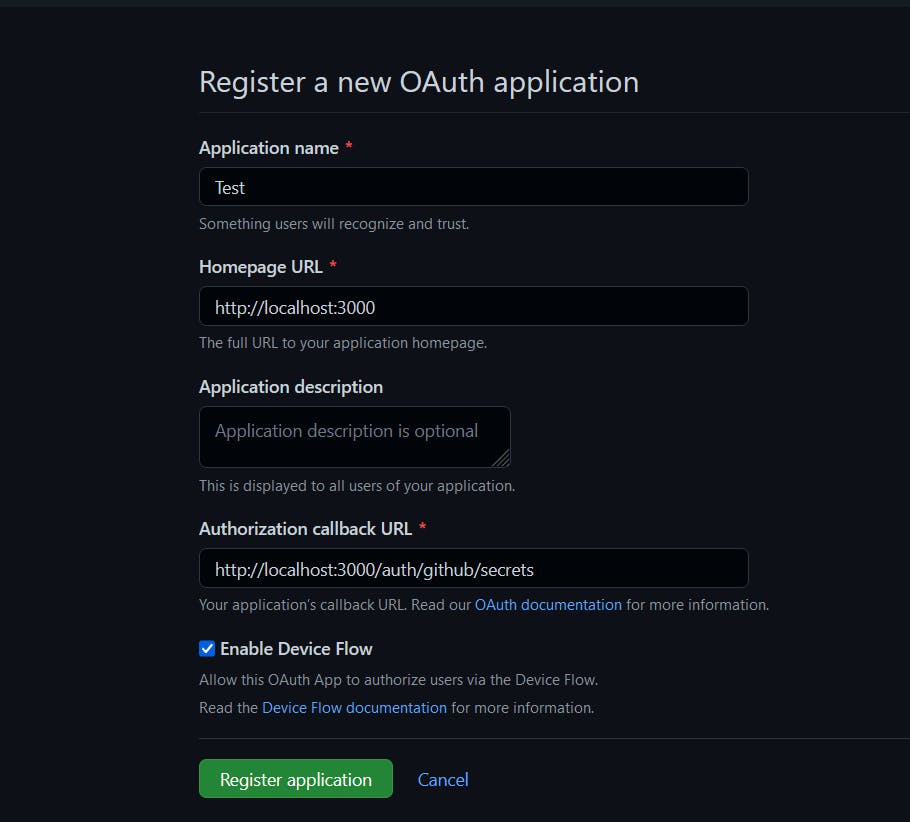
Copy the Client ID and Client Secret into our
.envfile. We can get Client secret by clicking on generate button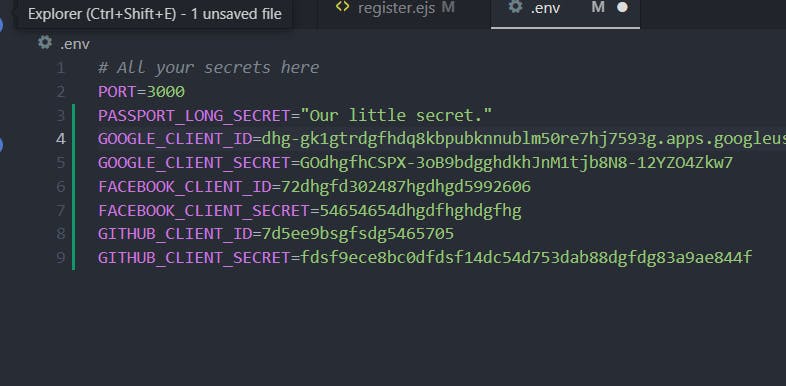
We need to add githubId for our userSchema
 const userSchema = new mongoose.Schema ({
   email: String,
   username: String,
   googleId: String,
   facebookId: String,
   githubId: String
 });
Let's configure the GitHub authentication strategy. Add the following code just below the Facebook strategy like shown below
 // -------FACEBOOK STRATEGY--------
 passport.use(new FacebookStrategy({
     clientID: process.env.FACEBOOK_CLIENT_ID,
     clientSecret: process.env.FACEBOOK_CLIENT_SECRET,
     callbackURL: "http://localhost:3000/auth/facebook/secrets",
     enableProof: true
   },
   function(accessToken, refreshToken, profile, cb) {
     User.findOrCreate({ facebookId: profile.id }, function (err, user) {
         return cb(err, user);
     });
   }
 ));

 // -------GITHUB STRATEGY--------
 passport.use(new GitHubStrategy({
     clientID: process.env.GITHUB_CLIENT_ID,
     clientSecret: process.env.GITHUB_CLIENT_SECRET,
     callbackURL: "http://localhost:3000/auth/github/secrets"
   },
   function(accessToken, refreshToken, profile, cb) {
     User.findOrCreate({ githubId: profile.id }, function (err, user) {
       return cb(err, user);
     });
   }
 ));
Create a route for GitHub authentication and the redirection just below the Facebook authentication routes
 // -----GITHUB AUTHENTICATION-----
 app.get('/auth/github', passport.authenticate('github', { scope: [ 'user:email' ] }));

 app.get('/auth/github/secrets',
     passport.authenticate('github', { failureRedirect: '/login' }), function(req, res) {
         // Successful authentication, redirect secrets.
         res.redirect('/secrets');
     }
 );
Let's go ahead and add the buttons for GitHub inside the
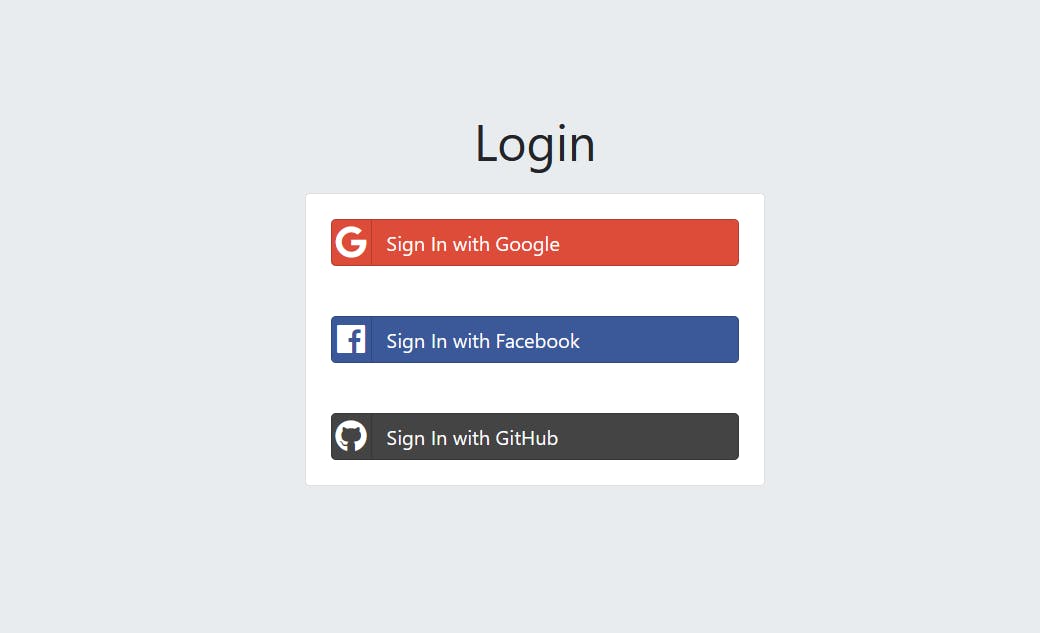
login.ejslike following<div class="oauthbox col-sm-4"> <div class="card"> <div class="card-body"> <a class="btn btn-block btn-social btn-google" href="/auth/google" role="button"> <i class="fab fa-google"></i> Sign In with Google </a> </div> <div class="card-body"> <a class="btn btn-block btn-social btn-facebook" href="/auth/facebook" role="button"> <i class="fab fa-facebook"></i> Sign In with Facebook </a> </div> <div class="card-body"> <a class="btn btn-block btn-social btn-github" href="/auth/github" role="button"> <i class="fab fa-github"></i> Sign In with GitHub </a> </div> </div> </div>And inside
register.ejs<div class="oauthbox col-sm-4"> <div class="card social-block"> <div class="card-body"> <a class="btn btn-block btn-social btn-google" href="/auth/google" role="button"> <i class="fab fa-google"></i> Sign Up with Google </a> </div> <div class="card-body"> <a class="btn btn-block btn-social btn-facebook" href="/auth/facebook" role="button"> <i class="fab fa-facebook"></i> Sign Up with Facebook </a> </div> <div class="card-body"> <a class="btn btn-block btn-social btn-github" href="/auth/github" role="button"> <i class="fab fa-github"></i> Sign Up with GitHub </a> </div> </div> </div>Let's check our app by going to http://localhost:3000
Common Pitfalls When Integrating Sign-In With Google/Facebook/Git
There are several common pitfalls when integrating sign-in with Google, Facebook, or Github:
Incorrect API keys or configurations - Incorrect API keys or configurations can cause authentication failures or incorrect data transmissions to the third-party service.
Third-party Dependencies: The integration may become broken if the third-party platform changes its APIs or deprecates them.
Cross-origin resource sharing (CORS) issues - Ensure that the correct CORS policies are in place to allow for successful authentication requests.
Lack of flexibility in the authentication process - Third-party authentication services may not provide enough flexibility for custom authentication requirements, such as multi-factor authentication.
Data privacy concerns - Users may be concerned about the privacy of their data when using third-party authentication services. It is important to communicate how their data will be used and protected.
User Experience: A poor user experience is the result of a slow sign-in process, confusing authorization prompts, or a broken sign-in flow.
It is important to thoroughly test and address these issues to ensure a seamless sign-in experience for the users.
Conclusion
If you're looking to implement Sign In With Google, Facebook and GitHub, I hope you found this post helpful! Sign In With Google, Facebook and GitHub is a great way to allow users to quickly sign in to their account without having to provide additional login details, and they can be especially helpful if users need to sign in from a mobile device. I hope this post helped you get set up with Sign In With Google, Facebook and GitHub, and if you have any questions or concerns, please let me know! Thanks for reading, and happy coding!
The completed Code is available here.