


Table of contents

No headings in the article.
This tutorial will introduce you to the basics of using tensorflow and heroku for django. We will see how to implement image classification using the tensorflow library with the django web framework and then host the django website on heroku.
This tutorial believes that you already have the trained model saved as .h5 file. Once you have the file, you will be able to build what this an image classification website at the end of this post. Even if you don't have the model, you may follow along because you will easily be able to understand how to integrate the h5 models in django for image classification projects and the steps will be simple and understandable since it will show every steps you need to follow to successfully deploy your image classification website.
What is Django?
Django is a high-level Python web framework that encourages rapid development and clean, pragmatic design. Built by experienced developers, it takes care of much of the hassle of web development, so you can focus on writing your app without needing to reinvent the wheel. It’s free and open source. To learn more they have got a great documentation here.
What is Tensorflow?
TensorFlow is an end-to-end open source platform for machine learning. It has a comprehensive, flexible ecosystem of tools, libraries and community resources that lets researchers push the state-of-the-art in ML and developers easily build and deploy ML powered applications.
What is Heroku?
Heroku is a cloud platform as a service (PaaS) supporting several programming languages. Developers, teams, and businesses of all sizes use Heroku to deploy, manage, and scale apps.
Let's get started with building the project:
1. Creating Virtual environment
First step is to create a virtual environment so that we can download and store the necessary packages for this particular project inside a separate environment from the system packages. To create a virtual env:
$ py -3 -m venv env
Activate the env:
$ .\env\Scripts\activate
2. Install django
We need django, so we will install django using pip:
$ pip install django
3. Create a django project
After downloading django, we will create our django project using django-admin command. In the following, > PotatoLeafDisease is our project name and you may give it any name:
$ django-admin startproject PotatoLeafDisease
$ cd PotatoLeafDisease
4. Create django app
Next step is to create our app inside our project. '> classifierApp' is our app in the following:
$ python manage.py startapp classifierApp
Inside the > settings.py file, add the app we just created in the > INSTALLED_APPS list
INSTALLED_APPS = [
    'django.contrib.admin',
    'django.contrib.auth',
    'django.contrib.contenttypes',
    'django.contrib.sessions',
    'django.contrib.messages',
    'django.contrib.staticfiles',
    'classifierApp',
]
5. Create a > model that will store our classification results in django backend. Go to > models.py file and write the following code
from django.db import models
from django.utils import timezone
# Create your models here.
class Result(models.Model):
    imagepath = models.TextField()
    image = models.ImageField(null=True, blank=True)
    predicted = models.TextField()
    confidence = models.IntegerField(default=0, null=True, blank=True)
    saved = models.DateTimeField(default=timezone.now)

    class Meta:
        ordering = ('-saved',)

    def __str__(self):
        return self.imagepath
The model Result will store the imagepath details and the predicted class with its confidence percentage. Now after making changes to > models.py we need to do migrations to update the configuration of database:
$ python manage.py makemigrations

$ python manage.py migrate
Register the model inside the > admin.py file:
from django.contrib import admin
from . import models


# Register your models here.
admin.site.register(models.Result)
6. Create *models folder
Create a new folder inside the root directory in the same directory where classifierApp is stored and put the model file (.h5) and labels.json file.
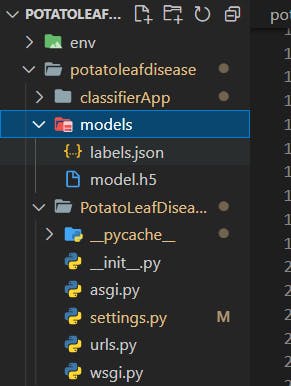
The > labels.json file looks similar to below:
{
    "0": "A",
    "1": "B",
    "2": "C",
    "3": "U"
}
7. Create views
We will now load our model using keras and use this model for prediction of the class of a new image. For that we need to install few libraries:
$ pip install keras

$ pip install tensorflow

$ pip install Pillow
Inside the > views.py, write the following code:
from django.shortcuts import render

from django.core.files.storage import FileSystemStorage
from .models import Result
from rest_framework.views import APIView
from rest_framework.response import Response
from .serializers import LeafDiseaseSerializer

from keras.models import load_model
from keras.preprocessing import image
import json
import tensorflow as tf
import numpy as np

import os
os.environ['TF_CPP_MIN_LOG_LEVEL'] = '3'


img_height, img_width = 256, 256
with open('./models/labels.json', 'r') as f:
    labelInfo = f.read()

labelInfo = json.loads(labelInfo)
# print(labelInfo)

tf.compat.v1.disable_eager_execution()
model_graph = tf.Graph()
with model_graph.as_default():
    tf_session = tf.compat.v1.Session()

    with tf_session.as_default():
        model=load_model('./models/model.h5')

# Create your views here.
def index(request):
    return render(request, 'index.html')

def predictImage(request):
    # print(request)
    # print(request.POST.dict())

    try:

        fileObj = request.FILES['filePath']
        fs = FileSystemStorage()

        filePathName = fs.save(fileObj.name, fileObj)
        filePathName = fs.url(filePathName)
        testimage = '.'+filePathName
        # print(testimage)
        # print(filePathName)

        # print(type(testimage))

        # if '%20' in testimage:
        #     testimage = fileObj.replace("%20", ' ')
        #     print(testimage)

        img = image.load_img(testimage, target_size=(img_height, img_width))
        test_image = image.img_to_array(img)
        test_image = np.expand_dims(test_image, axis = 0)

        confidence = 0
        with model_graph.as_default():
            with tf_session.as_default():
                pred = model.predict(test_image)
                # print(pred)
                confidence = round(np.max(pred) * 100, 2)

        predictedLabel = labelInfo[str(np.argmax(pred[0]))]
        print('Predicted label: ', predictedLabel)
        print(f'Confidence : {confidence}%')


        filename = filePathName.split('/')[-1]
        print(filename)

        new_item = Result(imagepath = filePathName , image = filename, predicted = predictedLabel, confidence = confidence)
        new_item.save()

        context = {'filePathName':filePathName, 'predictedLabel': predictedLabel, 'confidence': confidence, 'filename': filename}
        return render(request, 'index.html', context)

    except:
        return render(request, 'index.html')


def viewDataBase(request):
    all_results = Result.objects.all()

    for i in all_results:
        print(i.imagepath)
        break

    # listOfImages = os.listdir('./media/')
    # listOfImagesPath = ['./media/' + i for i in listOfImages]
    context = { 'all_results':all_results}  #  'listOfImagesPath': listOfImagesPath,
    return render(request, 'viewDB.html', context)
In the above code, we are first importing the libraries and then loading the > labels.json file and the model which is > .h5. For that we use load_model from keras.models load it with tensorflow Graph.
Following it is defining of views for our templates. We have total three views ... index, predictImage, viewDataBase.
i. index view is the home page view.
ii. predictImage view is for predicting the class of image but it will render the same index.html but with predicted results.
iii. Finally the viewDataBase view will show the saved results.
So for the template files you may either create one of your own but in this post I've used downloaded one from github.
I followed the steps from this youtube link and used the same front end static files and templates in this post.
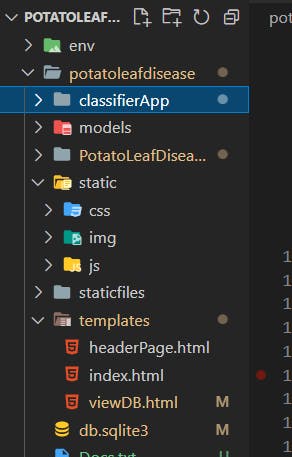
8. Create the template files
If you have already prepared your own template files and static files or either downloaded from above link, the next step is to create a new folder called template, and static inside project folder (root folder). Put the html files inside the template folder and then static files or folders such as css, js, and image files inside the static folder. The file directory structure looks as below:
Let's give the path of templates inside > settings.py file in > TEMPLATES list:
TEMPLATES = [
    {
        'BACKEND': 'django.template.backends.django.DjangoTemplates',
        'DIRS': [os.path.join(BASE_DIR, 'templates')],
        'APP_DIRS': True,
        'OPTIONS': {
            'context_processors': [
                'django.template.context_processors.debug',
                'django.template.context_processors.request',
                'django.contrib.auth.context_processors.auth',
                'django.contrib.messages.context_processors.messages',
            ],
        },
    },
]
Also add the following paths :
STATIC_URL = 'static/'

STATICFILES_DIRS = [
    os.path.join(BASE_DIR, 'static')
]


MEDIA_URL = '/media/'
MEDIA_ROOT = os.path.join(BASE_DIR, 'media')
STATIC_ROOT = os.path.join(BASE_DIR, 'staticfiles')
9. Create urls
First create > urls.py file inside the app folder (classifierApp) and create urlpatterns for the view
from django.urls import path
from . import views
from django.conf.urls.static import static
from django.conf import settings

app_name = 'classifierApp'

urlpatterns = [
    path('', views.index, name='homepage'),
    path('predict', views.predictImage, name='predict'),
    path('viewdb', views.viewDataBase, name='view'),

]

urlpatterns += static(settings.MEDIA_URL, document_root=settings.MEDIA_ROOT)
urlpatterns += static(settings.STATIC_URL, document_root=settings.STATIC_ROOT)
Go the the > urls.py file of project folder which is the same directory where settings.py file is stored and include the app urls
from django.contrib import admin
from django.urls import path, include

urlpatterns = [
    path('admin/', admin.site.urls),
    path('', include('classifierApp.urls', namespace='potatoleafdisease')),
]
Run the following command to collect the static files:
$ python manage.py collectstatic
Run the server and check if the django is running fine;
$ python manage.py runserver
10. Deploy on Heroku
Firstly install the following modules
$ pip install gunicorn

$ pip install whitenoise

$ pip install dj-database-url

$ pip install psycopg2

$ pip install dj-database-url
Add all dependencies installed in env to > requirements.txt,
$ pip freeze > requirements.txt
If you are using tensorflow version 2.x.. you may probably experience the slug size problem in case of free hosting on heroku and some of the solutions to it include using > tensorflow-cpu instead of tensorflow because tensorflow itself adds up to nearly 500mb size which while tensorflow-cpu takes relatively low slug size.
Othe techniques include link:
- Move large assets like PDFs or audio files to asset storage.
- Remove unneeded dependencies and exclude unnecessary files via.slugignore.
- Purge the build cache.
Create Procfile
In the Procfile: PotatoLeafDisease is a projectname
web: gunicorn PotatoLeafDisease.wsgi —log-file -
Make runtime.txt , all those files(requirements.txt, Procfile, and runtime.txt) should be inside the root directory(inside project directory)
runtime.txt:
python-3.10.3
Check the supported version in devcenter.heroku.com
In order to host a website on heroku, we need to create an account on heroku and download and set up the heroku CLI
i. Make a heroku account
ii. Download Heroku CLI
iii. Configure Django Heroku:
We will add the files on heroku using git
$ git init

$ git add .

$ git commit -m "First commit"
Log into heroku by typing into the command line
heroku login
Create a website name
$ heroku create potatoleafdisease
Disable collectstatic:
$ heroku config:set DISABLE_COLLECTSTATIC=1
In the settings.py :
Add it in MIDDLEWARE list:
DEBUG = False
ALLOWED_HOSTS = ['potatoleafdisease.herokuapp.com', 'localhost', '127.0.0.1']


MIDDLEWARE = [
  # 'django.middleware.security.SecurityMiddleware',
  'whitenoise.middleware.WhiteNoiseMiddleware',

]
In case use want to use the database from the heroku, specify the following in settings.py to say you will use the default heroku database.
Database update for heroku
import dj_database_url

db_from_env = dj_database_url.config(conn_max_age=600)
DATABASES['default'].update(db_from_env)
Make migrations on heroku using following (This is not necessary if we don’t want to make changes or use database in our website)
$ heroku run python manage.py makemigrations

$ heroku run python manage.py migrate
Now finally push the files to heroku:
$ git push heroku master
Open the website from terminal as below, you can also directly open from your heroku account dashboard.
$ heroku open
Finally our image classification project with django and heroku integration is completed.
In case, you want to make an update to your website or improve your model, you can make changes to the local files first and the push it again to heroku. This will update the files on heroku and updated website will be displayed.
In order to do this, we will again git to push our edited files:
$ git add .

$ git commit -m "edited "

$ git push heroku master
Let's connect on github